Binocular Indirect Ophthalmoscopy (BIO) is a basic fundus examination technique that uses a head-mounted illuminated headset to binocularly and stereoscopically view the fundus under mydriasis. A condensing lens (usually 20D or 25D) is held in front of the patient’s eye, forming an inverted real image of the fundus in front of the examiner’s eye for observation. The magnification is 2–4× depending on the lens used, and the field of view is wide at 30–60°, allowing full circumferential observation of the peripheral retina.
Compared to direct ophthalmoscopy, the magnification is lower, but the wide field of view, stereopsis, and combination with scleral depression allow detection of peripheral retinal tears, retinal detachment, and lattice degeneration with high sensitivity. This examination is indispensable in the management of vitreoretinal diseases, and detailed circumferential fundus evaluation before retinal detachment surgery cannot be performed without BIO. The American Academy of Ophthalmology (AAO) Preferred Practice Pattern 2025 also recommends dilated BIO with scleral depression for evaluation of acute posterior vitreous detachment, retinal tears, and lattice degeneration[2].
The greatest advantage of binocular indirect ophthalmoscopy is that the examiner can hold the condensing lens and the scleral depressor in each hand. While depressing the sclera, the retina can be observed stereoscopically, allowing dynamic observation (retinal movement, extent of detachment) and tangential observation (elevation of tear edges) through depression. These findings cannot be obtained with monocular indirect ophthalmoscopy or the non-contact lens method.
Mastering BIO requires considerable training. It is said that “fundus examination with binocular indirect ophthalmoscopy is often avoided because it is troublesome and takes time to master, but it allows observation of many findings that cannot be obtained by other methods. It is an essential examination for improving diagnostic accuracy and selecting the correct treatment.” In fact, the difficulty of spatial orientation with the inverted image is a major obstacle to residents’ proficiency, and in recent years, the effectiveness of educational methods using augmented reality simulators has been reported [8].
Charles L. Schepens developed the binocular indirect ophthalmoscope in 1945, revolutionizing retinal detachment management and earning him the title “father of retinal detachment” [1].
QIn indirect ophthalmoscopy, the image appears upside down. Can it be observed correctly?
A
In indirect ophthalmoscopy, an inverted real image of the fundus (upside-down and reversed left-right) is formed in front of the examiner’s eye. That is, the superior retina appears in the lower part of the field, and the right retina appears on the left. This is an optically accurate phenomenon, and the examiner, through training, automatically interprets the inverted image while observing. Until accustomed, spatial orientation may be confusing, but it is common practice to become proficient by simultaneously sketching the fundus.
2. Comparison with Direct Ophthalmoscopy and Non-Contact Lens Method
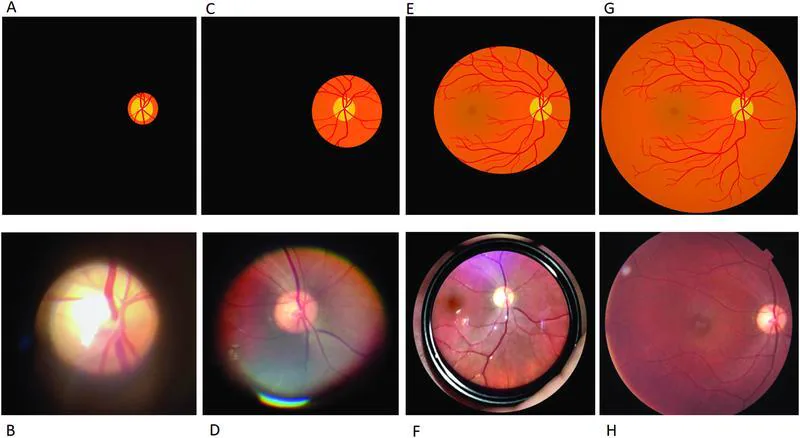
Corr RH. Fundoscopy in the smartphone age: current ophthalmoscopy methods in neurology. Arq Neuropsiquiatr. 2023;81(5):502-509. Figure 4. PMCID: PMC10232018. License: CC BY.
The schematic diagrams in the upper row and clinical photographs in the lower row show differences in field of view and magnification of fundus images obtained with conventional direct ophthalmoscope (A, B), PanOptic ophthalmoscope (C, D), indirect ophthalmoscope using a 20-diopter condensing lens (E, F), and retinal photography (G, H). These correspond to the field of view and magnification characteristics of each examination method discussed in the section “Comparison with direct ophthalmoscopy and pre-corneal lens method.”
Indirect ophthalmoscopy is used selectively with direct ophthalmoscopy and the pre-corneal lens method (slit-lamp microscope + convex lens) depending on the purpose.
As a general rule for choosing the method, the indirect ophthalmoscope is best for examining retinal tears, detachments, and degeneration in the peripheral retina, while the slit-lamp biomicroscopy with a fundus lens is suitable for detailed evaluation of the optic disc and macula. The direct ophthalmoscope is sometimes used for simple screening observations.
BIO forms an inverted real image through the following optical path:
The light source (halogen/LED) in the headset emits illumination light
The illumination light is focused toward the patient’s pupil through a condenser lens
The illumination light reaches the fundus (retina), and reflected/scattered light exits through the pupil
The condensing lens (convex lens) held by the examiner refracts the outgoing light, forming an inverted real image between the eye and the condensing lens (on the examiner’s side)
The examiner’s both eyes observe this real image from different angles, creating stereopsis through binocular disparity
The greater the refractive power (D value) of the condensing lens, the shorter the focal length, resulting in lower magnification but a wider field of view. The approximate magnification is calculated as “refractive power of the eye (approximately 60 D) ÷ D value of the condensing lens.”
Lens
Focal length
Magnification (approx.)
Field of view
Main uses
14D
Approx. 71 mm
Approx. 4.3x
Approx. 37°
Detailed observation of optic disc and macula
20D
Approx. 50 mm
Approx. 3x
Approx. 45°
Standard fundus examination in adults
25D
Approx. 40 mm
Approx. 2.4x
Approx. 50°
Premature infants / children
28D
Approx. 36 mm
Approx. 2.3x
Approx. 53°
Wide-angle observation of peripheral retina
30D
Approx. 33 mm
Approx. 2x
Approx. 60°
Far periphery / small pupil
The distance between the lens and the patient’s eye should be approximately 5–8 cm, corresponding to the focal length. The larger the pupil diameter (sufficient mydriasis), the better the quality of stereopsis.
In indirect ophthalmoscopy, both illumination and observation light pass through the pupil. Therefore, a larger pupil diameter provides a brighter and wider fundus image. With a small pupil (less than 4 mm), the observable field is limited, and scleral depression of the peripheral retina becomes difficult.
Mydriasis is achieved approximately 20–30 minutes after instillation.
The mydriatic effect usually lasts 4–6 hours, during which photophobia (sensitivity to light) and difficulty with near vision occur.
In patients with a history of angle closure or shallow anterior chamber, there is a risk of acute glaucoma attack. Therefore, anterior chamber depth should be assessed beforehand using slit-lamp microscopy or axial length measurement.
In children, consider using cycloplegics (cyclopentolate 1%).
QWhat are the side effects and precautions of mydriatic agents?
A
The main side effects of mydriatic agents (tropicamide 0.5% + phenylephrine 0.5%) are photophobia (lasting 4–6 hours) and difficulty with near vision due to cycloplegia. Instruct patients to avoid driving cars or bicycles on the day of the examination. The most important complication is acute angle-closure glaucoma attack. In patients with shallow anterior chamber (e.g., hyperopia, elderly, nanophthalmos), mydriasis can occlude the angle and cause a rapid rise in intraocular pressure. Before mydriasis, check anterior chamber depth with a slit lamp; if shallow anterior chamber is suspected, perform gonioscopy before deciding on mydriasis.
For areas peripheral to the equator, add scleral depression.
Use a depressor (scleral depressor) simultaneously with ophthalmoscopic observation.
Place the tip of the depressor against the sclera over the eyelid and press gently.
A retinal elevation appears in the fundus, bringing the far periphery (near the ora serrata) into view.
Move the depressor while pressing to sequentially examine the entire circumference of the far periphery.
If tears, pseudo-tears, or degenerative areas are found, confirm findings before and after depression, and record dynamic changes (distortion, change in detachment area).
BIO with scleral depression is the gold standard for detecting peripheral retinal tears [3], and there are reports that acute horseshoe tears may be missed by non-contact slit-lamp examination [5]. On the other hand, recent studies comparing with ultra-widefield fundus imaging (UWF) have shown that about half of horseshoe tears could not be detected by UWF alone, and it is considered that UWF alone cannot completely replace BIO with scleral depression [4]. It has been reported that intraocular pressure during scleral depression can rise to an average of 65 mmHg and up to 88 mmHg even in outpatient examinations, which may affect ocular perfusion; therefore, caution should be exercised regarding the strength and duration of depression in cases of high intraocular pressure or glaucoma[6].
Fundus findings are recorded in the following format.
Clock direction: 1 to 12 o’clock (record with 12 o’clock as superior. Example: “5 o’clock direction”)
Distance from equator: posterior pole (post), equator (equator), ora serrata (ora serrata)
Disc diameter (DD): Use disc diameter as 1 DD for distance reference, e.g., “1 DD from equator”
Sketch: Record the location, shape, and extent of retinal detachment and tears on a fundus sketch sheet (with concentric circles) using colored pencils. It is said that “retinal detachment surgery without a sketch is as reckless as sailing without a chart”
Examination in the sitting position is possible, but stereoscopic viewing of the temporal and nasal sides becomes difficult, and the range of depression examination is limited. For a full circumferential detailed examination, the supine position is recommended.
5. Representative Examination Findings and Management
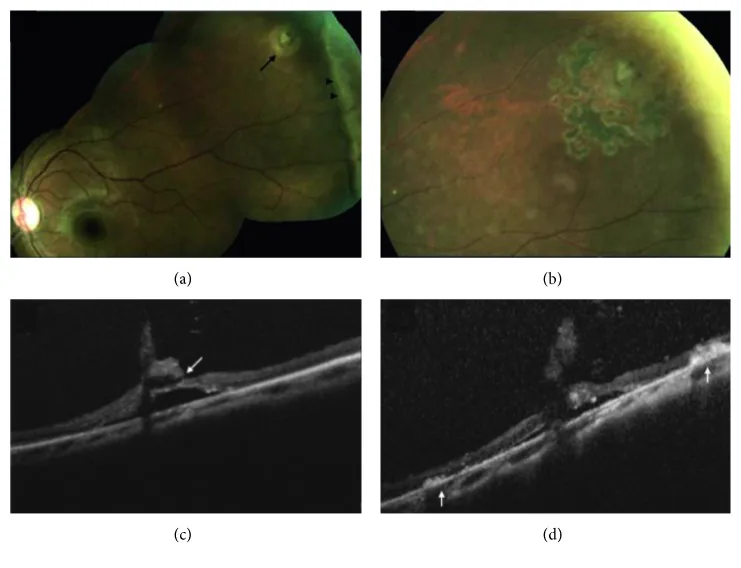
Chu RL, et al. Morphology of Peripheral Vitreoretinal Interface Abnormalities Imaged with Spectral Domain Optical Coherence Tomography. J Ophthalmol. 2019;2019:3839168. Figure 3. PMCID: PMC6590607. License: CC BY.
Fundus photograph (a) shows a retinal tear (arrow) associated with a cystic retinal tuft and white without pressure (arrowhead) in the left eye; changes are shown 1 month after laser retinopexy (b), preoperatively on SD-OCT (c), and 1 week postoperatively (d). This corresponds to the differentiation of tears, pseudotears, and white without pressure discussed in the section “Representative Examination Findings and Management.”
Scleral indentation is also useful for differentiating true retinal breaks from pseudo-breaks (white with pressure: WWP).
True retinal break: The edges of the break become clearly elevated with indentation. If subretinal fluid is present around it, the detachment is considered to be progressing.
WWP: Appears white with indentation, but the borders are indistinct and it disappears after release of indentation.
This differentiation is extremely important in deciding whether prophylactic laser photocoagulation is necessary or observation is sufficient.
6. Pathophysiology: Optics of the indirect ophthalmoscope and principles of stereopsis
The formation of the inverted real image observed with BIO is based on geometric optics. The magnification (M) is roughly estimated from the ratio of the condensing lens power (D) to the equivalent power of the eye (approximately 60 D).
Approximate formula for magnification: M ≒ 60D ÷ lens D value
Example: When using a 20D lens → M ≒ 60 ÷ 20 = 3×
Example: When using a 28D lens → M ≒ 60 ÷ 28 ≒ 2.1×
Actual magnification is slightly higher than the above due to lens design (aspherical, plane mirror correction).
Modern condensing lenses are typically aspherical, correcting spherical and chromatic aberrations in the periphery. This provides a clear image up to the practical field edge with 20D/28D lenses.
Stereopsis with the indirect ophthalmoscope occurs because the examiner’s both eyes observe the fundus simultaneously from different angles through the pupil.
The left and right eyes receive reflected light from the fundus at different angles of incidence.
This binocular disparity is perceived as depth information of the retina (height of elevation, depth of depression).
If dilation is insufficient (small pupil diameter), the difference in the angle of incidence between the two eyes decreases, resulting in poor stereopsis.
Since stereopsis improves with larger pupil diameter, adequate dilation (ideally 6 mm or more) is a factor that affects examination accuracy.
Optos® (200° ultra-widefield scanning laser ophthalmoscope) and CLARUS® (45–133° ultra-widefield fundus camera) can acquire wide-angle fundus images without mydriasis or contact. They are highly useful for screening, documentation, patient education, and remote reading.
However, ultra-widefield fundus imaging provides planar images and cannot replace the stereoscopic view, dynamic observation (changes with scleral indentation), and evaluation of the far periphery near the ora serrata provided by BIO. BIO is indispensable for final confirmation of “lesions that appear as tears” on two-dimensional images, and the two are complementary.
Headsets with built-in digital sensors and recording capabilities (Digital BIO) have been commercialized. They display real-time video on an external monitor and can record video and still images, facilitating applications in preoperative explanation, education, and remote consultation.
Remote Reading and Retinopathy of Prematurity Screening
In developing countries, remote islands, and NICU facilities where it is difficult to have an ophthalmologist on site, systems are being developed to transmit BIO examination video in real time to remote specialists for reading. Retinopathy of prematurity (ROP) screening is a particularly promising application area, and the combination of digital BIO and remote reading may help reduce disparities in healthcare access. A prospective study comparing wide-field digital fundus photography and BIO for ROP screening found that digital photography should remain an adjunct rather than replace BIO alone[7].
Relationship with AI-Equipped Wide-Angle Fundus Cameras
AI-based wide-angle fundus cameras for screening diabetic retinopathy, ROP, and glaucoma are being commercialized. While these systems are useful as first-line screening, BIO is still considered the primary examination technique in precision clinical settings such as surgical indication assessment and treatment monitoring.
Sen M, Honavar SG. Charles L. Schepens: Eye Spy. Indian J Ophthalmol. 2023;71(7):2625-2627. PMID: 37417098. PMCID: PMC10491037.
Kim SJ, Bailey ST, Kovach JL, et al. Posterior Vitreous Detachment, Retinal Breaks, and Lattice Degeneration Preferred Practice Pattern®. Ophthalmology. 2025;132(4):P163-P196. PMID: 39918519.
Raevis J, Hariprasad SM, Shrier E. The Depressing Part of Retina: A Review of Scleral Depression and Scleral Indentation. Ophthalmic Surg Lasers Imaging Retina. 2021;52(2):71-74. PMID: 33626165.
Lin AC, Kalaw FGP, Schönbach EM, et al. The Sensitivity of Ultra-Widefield Fundus Photography Versus Scleral Depressed Examination for Detection of Retinal Horseshoe Tears. Am J Ophthalmol. 2023;255:73-79. PMID: 37468086.
Natkunarajah M, Goldsmith C, Goble R. Diagnostic effectiveness of noncontact slitlamp examination in the identification of retinal tears. Eye (Lond). 2003;17(5):607-609. PMID: 12855967.
Trevino R, Stewart B. Change in intraocular pressure during scleral depression. J Optom. 2015;8(4):244-251. PMID: 25444648.
Dhaliwal C, Wright E, Graham C, McIntosh N, Fleck BW. Wide-field digital retinal imaging versus binocular indirect ophthalmoscopy for retinopathy of prematurity screening: a two-observer prospective, randomised comparison. Br J Ophthalmol. 2009;93(3):355-359. PMID: 19028742.
Rai AS, Rai AS, Mavrikakis E, Lam WC. Teaching binocular indirect ophthalmoscopy to novice residents using an augmented reality simulator. Can J Ophthalmol. 2017;52(5):430-434. PMID: 28985799.
Copy the article text and paste it into your preferred AI assistant.
Article copied to clipboard
Open an AI assistant below and paste the copied text into the chat box.